今回は「ネガティブマージンを使って要素をずらす方法」について紹介していきます。
ネガティブマージンを理解することで、レイアウトの幅が広がるので、是非参考にしてください!
ネガティブマージンとは?
marginは基本的に「margin: 30px;」など正の数値を指定します。
しかし、marginは「margin-left: -30px;」のように負の値を指定することもできるのです。
この負の値のmarginのことをネガティブマージンと言います。
【CSS】ネガティブマージンを使って要素をずらす方法
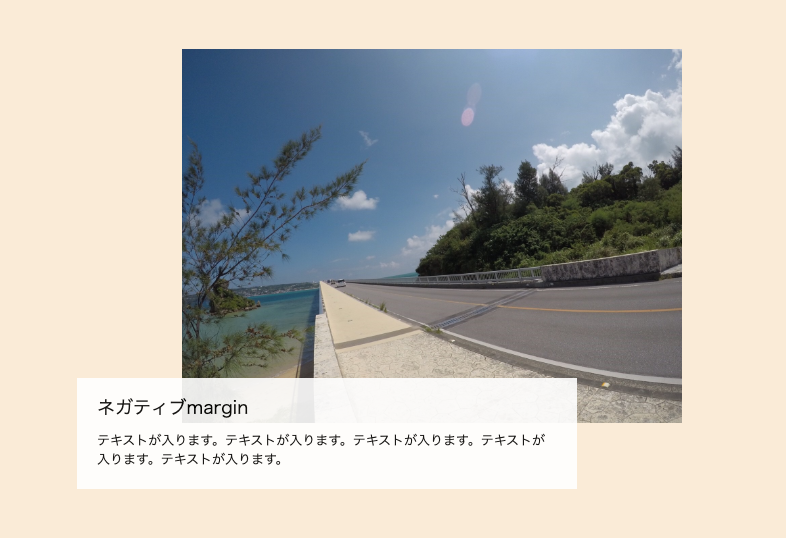
完成形は以下になります。
実際にネガティブマージンを使ったコーディングをしていきましょう。
HTML
<div class="box">
    <div class="box__img">
        <img src="./image/img1.png" alt="">
    </div>
    <div class="box__text">
        <h3>ネガティブmargin</h3>
        <p>テキストが入ります。テキストが入ります。テキストが入ります。テキストが入ります。テキストが入ります。</p>
    </div>
</div>
親要素boxの中に、画像を表示させる「box__img」とテキストを表示させる「box__text」の要素を用意します。
画像パスは自由に変えてみてください。
CSS
/* http://meyerweb.com/eric/tools/css/reset/
   v2.0 | 20110126
   License: none (public domain)
*/

html, body, div, span, applet, object, iframe,
h1, h2, h3, h4, h5, h6, p, blockquote, pre,
a, abbr, acronym, address, big, cite, code,
del, dfn, em, img, ins, kbd, q, s, samp,
small, strike, strong, sub, sup, tt, var,
b, u, i, center,
dl, dt, dd, ol, ul, li,
fieldset, form, label, legend,
table, caption, tbody, tfoot, thead, tr, th, td,
article, aside, canvas, details, embed,
figure, figcaption, footer, header, hgroup,
menu, nav, output, ruby, section, summary,
time, mark, audio, video {
    margin: 0;
    padding: 0;
    border: 0;
    font-size: 100%;
    font: inherit;
    vertical-align: baseline;
}
/* HTML5 display-role reset for older browsers */
article, aside, details, figcaption, figure,
footer, header, hgroup, menu, nav, section {
    display: block;
}
body {
    line-height: 1;
}
ol, ul {
    list-style: none;
}
blockquote, q {
    quotes: none;
}
blockquote:before, blockquote:after,
q:before, q:after {
    content: '';
    content: none;
}
table {
    border-collapse: collapse;
    border-spacing: 0;
}
img {
    vertical-align: bottom;
    max-width: 100%;
}

/* ネガティブmargin */

body {
    margin-top: 100px;
    background-color: antiquewhite;
}


.box {
    margin: 0 auto;
    width: 500px;
}

.box__text {
    box-sizing: border-box;
    margin: -45px -105px;
    padding: 20px;
    width: 500px;
    background-color: #fff;
    opacity: 0.9;
}

.box__text h3 {
    font-size: 18px;
    margin-bottom: 15px;
}

.box__text p {
    font-size: 13px;
    line-height: 1.5;
}
リセットCSSで余計なCSSのスタイルを消しておきました。
今回のCSSのポイントは以下になります。
.box__text {
    box-sizing: border-box;
    margin: -45px -105px;
    padding: 20px;
    width: 500px;
    background-color: #fff;
    opacity: 0.9;
}
「box-sizing: border-box;」を指定することで、paddingが要素の中に含まれるようにします。
「padding: 20px;」で内側に余白をつけ、「width: 500px;」で画像と同じ幅に。
そして、「margin: -45px -105px;」を指定することで、テキストが画像に被さって左にずらすことができます。
ネガティブマージンを使うことで、完成形のように画像の詳細を説明するテキストボードみたいなレイアウトを作ることができますよ!
まとめ
以上が、「ネガティブマージンを使って要素をずらす方法」でした。